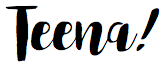
Are you wondering how to convert a horizontal video to vertical for IGTV or even Pinterest?
I’ve got some great news. Vertical videos are not a fad!
So if you usually create YouTube videos or record in landscape mode, it’s quick and easy to repurpose your video content by converting the horizontal videos to vertical videos for both IIGTV and Pinterest, some people are worried about posting the exact same video on different sites like YouTube, IGTV and Pinterest.
But if you add a different thumbnail or add a new opening image to the start of the video using this vertical video technique provides an eye-catching start to each video, which can make them look totally different on each side.
Now, if you’re new here, my name is Teena Hughes and on this Channel, I love to help you get the most out of videos.
So click that Subscribe button now, because if you can create videos feeling confident and get them done easier and faster, and have fun while you’re doing it, then you can quickly find your audience and boost your income online with YouTube.
Just to let you know, I put a link to everything I mentioned down in the Description below, and if you’re not watching this on YouTube, that’s okay. Pop back over there and grab all the deets in the description.
So let’s hop onto my computer and get started. I’m using ScreenFlow for Mac for my video editing, but this works the same in most other editing software. Plus, I have an app to share with you too, to make this even easier. Okay, let’s go to start a new Project in ScreenFlow for Mac.
Normally I have it set to 1920 x 1080 for a regular YouTube video, but because I want to do a vertical video, I’m going to swap these two numbers.
So I’m going to change the 1920 to 1080 and then change this to 1920. I’ve now got a new Project – and even though that looks small on the screen, I can just do the Command key and the “plus” sign to increase that.
I can grab this bar and drag that down. So what I’m going to do here on the media library, I’m going to pull in a video that I’ve already created. I’ve now dragged the previous video that I’ve made here into the sidebar, so that’s ready to go. What I always like to do is to select this crop symbol down here, and then I’m going to change the color of the background to white and then click the green tick or check mark.
I don’t do that for every video, I just like to have white background sometimes. So the next thing I do is drag down my normal video. And once I’ve put it on the timeline, you can see that it appears in the center of the vertical video. Now there are a few different things I could do. I could increase the size and just show parts of the video. I could grab any one of these indicators (handls). So it just depends on how the video has been created.
And if I actually took up all of the space of the horizontal video when I made this video, and is that what I want to continue with? So you have the choice, you can crop parts of the video out. You can zoom it in, you can still do whatever you like, but now you’ve got it on a vertical layout and I quite like that.
So I’m going to leave it set to that shape. And then I’m going to add in some text elements, this video is about how to grow your YouTube channel faster. So I’d like to add that in as a text box on the right-hand side of the screen here, I’m picking on “T” for Text and the plus symbol to get a text box.
I can then just drag that into position and you can see down here, it’s highlighted on the timeline. I can stretch that text box to be as long as I like so that it lasts a long time. So up here, I’m going to put the title of the video and I don’t need that dark gray background. So the first thing I’m going to do is click on the text color and change it to black. And then I’m going to uncheck the back door. So I don’t have that dark. Right. Okay. Let’s change the text to a two channel.
What I can do is highlight the text with command a and the here I’m going to change the text to my favorite, which is League Spartan. I’m going to click on the center icon, and then I’m going to drag this into position. Now the one thing to pay attention to when you’re creating the tool videos, the vertical videos, depending on where you post them, they may get cropped a bit at the top and a bit at the bottom. So don’t in this case, I wouldn’t put this text right up here just in case it gets cropped. So I’ll keep it further down. And what I might also do is give that some animation. So down the bottom here, while I’ve got that text box selected, you can see the yellow line around it in the timeline and come over here and click on building animation.
And you’ll see the text just disappeared off the screen until I choose which animation. So here I can choose all kinds of things. So I might want to do character flip. I might want to do gravity scale break apart or type by let’s just do, because that’s very simple. And so down here, I’ll have a look at what’s the duration do I want it to be right now? It’s set to, um, let’s go up to one second typewriter and come back here. And it’s at the beginning of the play head. So now, because I’ve already got that text coming in at the same time as the other text, I’m going to change it from typewriter to move into place. And this time I might make it two seconds about and offset. That means how far up do I want it to come from? So I’m going to add this too.
Let’s see. I will just drag it there and see what happens. Alrighty. So now when I’m back at the beginning of the play head, I quite like that. Now, if you wanted to put text at the bottom, what you can do, I like to drag the play, head back to the beginning again, and then I’m going to actually duplicate this text because it’s already got the font that I like, and I’m just going to click copy and paste and then drag the play, head back to the beginning again, and then drag that below. Now. Here’s where I can put something. If I’ve got a call to action, I want someone to do something or I could put my, uh, let’s just turn off the animation or I could put my website name. Let’s just do that.
Now I’ve typed in my website name. I’m going to highlight the text and I’m going to reduce the size. Let’s say, come down to 64. Yep. That works. Okay. And so now I’ve taken away the animation as well. So let me just turn the volume off so you don’t have to listen to that again and then I’ll click play. Okay. So there’s lots of activity that video will play through. You can see the video length here is just over two minutes and I could do all kinds of things, as well as just adding the text. I could add a color behind the text, um, in a text block if I wanted to do that. And, uh, for this exercise. So we’re just playing around with setting this up. So I’m going to leave the phone as it is. You can see that I’ve dragged in an entire video and I’ve just added as a textbooks. I’ve added my, um, URL. So that’s pretty good. Now this is ScreenFlow for Mac. You can do a similar thing in just about every video editing software that you can think of.
I’d like to show you how I also use square videos and turn those into vertical videos. So I’ve dragged one, in an example, I’m bringing it down to the timeline and just for this exercise, I’m going to place it right at the end of the other one. So here, I’m just dragging the play head over to the start of the new video. And as you can see, the square one takes up a lot more space than the horizontal one in this case. And just like before, when I can see the dots around the video, the handles, I can resize it. I can drag it out, do whatever I like. I’m going to leave it the same size. So what I might do this time is change the checks. Well, first of all, I might change the background. Let me do that. So I’m going to click on the crop sign here. I’m going to click on this little marker. What am I have? Ooh, that’s bright, right?
Hang on. One of it purple. Now I like the orange. Okay. And then click with the green tick or check so that it changes it. Now before the, the Teena Hughes bit. I can drag that down. That’s my URL. And up here, I might change this to Y square videos. And then I’m just going to drag that up a little bit and then let’s have a look from here. I’ll turn the volume of I’ll mute that audio and then play. They can see the pink video is playing. I’ve got lots of animation on there, and I’ve got a question at the top to grab people’s attention and I’ve got my URL at the bottom. Well, in this case, I’ve actually got my URL going right around the video. But down here, this could be your call to action. It doesn’t have to be your URL.
It can be any other message that you want. So that’s how you turn a square video into a vertical video. Do you remember? I mentioned an app earlier in this video. It’s so cool. And I really want to share it with you. It automatically transcribes your videos and add captions below them, and it can save them in four different shapes. Check it out over at teenageuseonline.com/vertical
And I’ll put that in this video so it’s easy for you to find in the description. OK, that’s it for today.
See you in the next video!
This is Teena Hughes from TeenaHughesOnline.com. Ciao ciao for now!
Want to chat about how t convert a horizontal video to vertical?
Here are a few ways to get in touch with me:
Have fun with making your own videos! I’d love to see them! And if you need some help, give me a yell – happy to chat about which steps to take next.
Hope to see you online soon!
Cheers